I’m a Ham

Yes, yes. We all know I’m a bit of a ham — at least when I get on stage. Probably the reason Dave and I work well together. I don’t think I know anyone else who commands a stage (at times while admittedly overacting) quite like he does. His special talent, though, is for people to fully realize that he’s hamming it up — but to enjoy it and fall in love with him, regardless. Now, THAT’S talent, people.

But, I digress. This post isn’t really about how hammy we (and, so it seems, our son is). It’s actually about a ham dinner I made recently.

(crickets chirping)

Yeah, it doesn’t get much lamer than that. (And, yeah, it’s another “recipe” post. Neener neener. ;-)) But for those of you who wonder what our meals look like — you know, the GOOD, I had a little time and energy to put into them meals vs. the after-school-meal-grind meals — here’s an example.

We’re still doing pretty well with the weekday vegetarian thing, although we don’t beat ourselves up if we end up taking a turkey sandwich (because it’s all we have in the house for the “main”) for lunch or have the occasion meat-inclusive dinner on a random Tuesday. All things in moderation, people, especially moderation. 😉 But, yeah, for us, we’re doing pretty well with it.

However, this particular meal was made on a Saturday, so I felt I had a “Get Out of Jail Free” card. I had also thawed a pound of ground beef (grassfed, local) and a thicker-than-I-realized ham steak (also grassfed, local), so no matter what, meat was on the menu. (Needless to say, the beef was used that Sunday.)

All I had to do for the ham was heat it up (in this case using a grill pan) and maybe throw on a maple mustard glaze; quick and easy. It took far more time to prepare the sides, truth be told. You don’t need much direction on the rice — it was just regular, long-grain (non-instant) rice which we cooked while the broccoli was roasting. I’m trying to retrain my patience since I haven’t found any organic instant rice. ANYhoo…

I'm a Ham - image  on https://megactsout.com


Roasted Broccoli with Garlic

2 heads of broccoli (or 1 large head of broccoli) {side note: ours was organic}
2-3 cloves of garlic, minced
Drizzle of olive oil
Zest of 1 lemon, juice of 1/2 – 1 lemon (depending on your taste)
S&P
Sprinkle or two of red pepper chili flakes (optional)

Heat oven to 425 degrees F.

Cut the broccoli to uniform sizes (as close as you can; don’t obsess) and place on baking sheet. Add the garlic, olive oil, lemon, and salt & pepper and toss well.

Roast in oven for ~20 minutes. (The garlic may brown quite a bit; that’s okay.) Taste and season with more S&P if needed, and add some chili flakes, if using. (We didn’t because any vegetables I make these days go into the baby’s mouth — a good thing — and I’d rather not pain him. ;-)) This is also yummy with some Parmesan cheese.

Maple Glazed Ham Steak

1 ham steak (size doesn’t really matter; make more of the glaze if you need, make less if you don’t seem to need it; cooking’s an art, not a science)
2 – 4 Tbsp. REAL maple syrup (not the “pancake syrup” stuff, please, for the love of God!!!)
1 – 3 tsp. dijon mustard
1/2 – 1 tsp. brown sugar (if you have it on hand; I didn’t and it was still fine)
Sprinkle or two each of ground clove and nutmeg

Heat your pan (grill or regular) to medium high. Prepare glaze using all the ingredients but the ham. You can either glaze the ham prior to cooking or while cooking (glazing both sides after each is cooked; this creates less burning and more “glazey” flavor than “hammy” flavor).

Either way, since this is a ham steak, you really only want to put a little color on the meat and heat it through (it’s already cooked, yay!), so use your judgement. It may need 4 minutes on each side…it may need 6 on the first and less on the second…or five on each. Just be sure to keep an eye on it that the glaze doesn’t burn (turn to medium if you’re worried about this happening).

* I also did a teensy drizzle of maple syrup over my rice and ham when finished. As Ado Annie says, I CAN’T SAY NO!

So, there you have it. One example of a Saturday evening meal in the ol’ hammed-up household. I try to keep it simple these days (since the moment the lil’ guy sees me cooking, he starts whining and fussing — he wants food, and he wants it IMMEDIATELY. We’re lucky to have such a great eater, but…), and it’s the little things — Dave loves (…wait for it…) rice. Rice with a meal (or, yes, even AS a meal) and salads, his two favorite things. Well, and maybe a wife who makes them for him without having to ask.

Easy Arse Broth

Yes, another food post! No, I’m not apologizing! 😉 I’m sure you’ll get a slew of DIY or Mommy or budget or cat posts at some point soon, so it is what it is.

It also must mean that, although our weather is teetering on warm/unseasonable, I’m ready to jump headlong into autumn (and start thinking about Christmas…which, admittedly, I should’ve probably done several months ago). We even went on our first-ever apple picking family adventure today — none of us had gone before! If only Hadley had more than two-and-a-half teeth, he would’ve eaten his weight in apples rather than sucking and piercing them with his little chompers.

So, here’s a little non-recipe that only takes a little time and thought in advance, a tiny bit of prep, and some freezer space. SO EASY!!!

Homemade Vegetable Stock

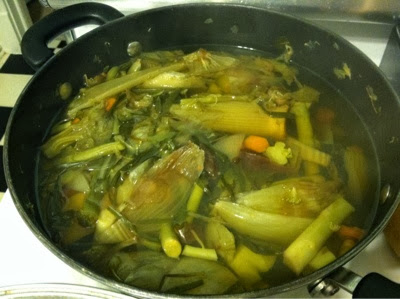
– Plastic freezer bag full o’ veggie cuttings (ANYTHING; we had everything from celery to carrot ends to onion peelings to part of a garlic bulb that I roasted, asparagus ends, and I can’t count how many broccoli stems — but, literally, you can use anything as long as you have a good array)
– Water to cover the veggies+
– Salt (optional; I didn’t use any)
– Bay leaf (optional; I forgot to throw it in, so I’ll just use one if I make soup with this)

Every time you find yourself chopping some vegetables for salad (or anything else), put the (clean) trimmings into a freezer bag; I keep one just for this purpose. Once it’s full enough, fill your pot about 2/3 full with your veggies (throw the rest back in the freezer; I had to do this), then pour in enough water to cover it and then some. Bring this to a boil, then turn down to a simmer and allow to cook as long as you can, at least an hour. The longer it cooks, the more the vegetables are able to infuse the water with their yumminess. Seriously, Dave wouldn’t shut up about how awesome the house smelled. With just veg water? Yep. ‘Twas awesome.

I'm a Ham - image blogger-image-1189397200 on https://megactsout.com

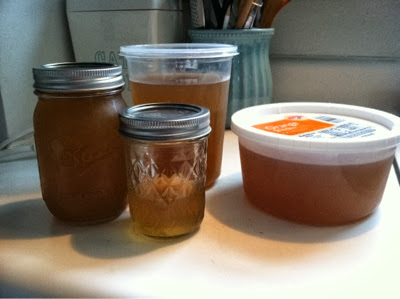
Allow to cool a bit and strain the contents. Again, allow to cool further (to room temperature) before putting in containers to store. In this case, I froze the larger amounts and threw the smaller jars in the fridge to use when I make rice and sauces.

I'm a Ham - image blogger-image-482525636 on https://megactsout.com

All in all, I made about 10 cups of stock. Oh, and when we buy stock/broth, we get low sodium to control what our intake is, which is why we didn’t use salt. Also, stock is technically unseasoned and ready for use in whatever you want (while broth is seasoned and yummy on its own), so it’s all in what you do with it that makes it SO GOOD!

All it took was some time (although it cooked while I was going about my normal what-not) and zero dollars. Win-win!

What would you use this stock for? A good, ol’ traditional soup? Or something more exotic? Share, share!

Muffins for My Muffin

Alternate titles: Don’t Call Me Muffin. Money for Muffin. Muffin But a G-Thang. This could go on and on and on…

I'm a Ham - image  on https://megactsout.com

I first made this recipe riiiiiight before I returned to school (and started sending Hadley back to his grandma’s house). We hadn’t really dabbled into the world of sending solids along too much beyond baby food-ish stuff before the summer, but he got SO into eating real food, I knew it was time to start sending some along. He’ll eat leftovers, defrosted/heated frozen veggies, cheese sticks…okay, almost everything.

I heard through the grapevine that he really has a thing for these muffins, so I made another batch to freeze-and-pull to keep the little guy happy. It’s good to know he already enjoys “real food.” And hopefully you will, too!

The recipe is pretty much this one, which I made pretty much to the T (two versions, one with applesauce that I admittedly used a tad too much of, and the other with blueberries), adding an extra sprinkling of cinnamon to the top before mixing them in. So, please know that this recipe isn’t one of my “started with this recipe, made it my own” recipes; I’m literally passing along 100 Days of Real Food’s recipe, which I know comes out nummy. 🙂 

Fruit, Nut, or Berry (or whatever you want them to be) Whole-Wheat Muffins

Serves: Makes 12 Muffins

Ingredients
  • 1½ cups whole-wheat flour (I used organic white whole-wheat flour)
  • ½ teaspoon salt
  • 2 teaspoons baking powder
  • ½ teaspoon cinnamon
  • â…› teaspoon nutmeg
  • 2 eggs
  • 2 tablespoons honey
  • 1 teaspoon pure vanilla extract
  • ¼ cup oil (I used coconut oil; melt it in the microwave first, then measure)
  • ¾ cup orange juice or apple juice (I used organic apple juice)
  • About 1 cup of total filling (berries, fruit, nuts, etc. – see below for details)
  • Muffin/Cupcake liners (I used silicone muffin trays, so I didn’t need these)

Instructions
  1. Heat oven to 400 degrees F.
  2. In a large bowl with a fork or whisk mix the flour, salt, baking powder, cinnamon and nutmeg.
    I'm a Ham - image  on https://megactsout.com


  3. Make a well (hole) in the center of the flour mixture and pour in the eggs, honey, vanilla, oil and orange juice. Mix the dry and wet ingredients together – do not overmix.

    I'm a Ham - image  on https://megactsout.com
    For those who may not know what coconut oil looks like (melted), here it is…with some flour in it.


  4. Now here is the fun part. If you are in a hurry just add 1 cup of blueberries, mashed up banana & nuts, or other filling of your choice. If you have 5 or 10 minutes extra (and some anxious helpers) do not add anything to the muffin batter before continuing with the next step.
  5. Line a muffin pan with liners and fill ⅔ to ¾ of the way full with batter. If you didn’t already add your filling, sprinkle 1 – 2 teaspoons of whatever you would like (from the list below or from your own creation) onto the top of each raw muffin in the pan. Then gently mix each one with a fork or spoon.
    Here are some options to consider for the fillings:
    – blueberries
    – diced strawberries
    – peeled and diced pears
    – applesauce
    – either diced or mashed up bananas and chopped walnuts
    – raisins and chopped pecans (I add an extra pinch of cinnamon to the muffins with this filling)
    – grated carrot and chopped walnuts
    – orange or lemon zest (only add ¼ to ½ teaspoon of zest per individual muffin)
    – a mix of dried fruit bits
    – jelly
    I'm a Ham - image  on https://megactsout.com

    I'm a Ham - image  on https://megactsout.com

    I'm a Ham - image  on https://megactsout.com
  6. After the filling has been mixed into each muffin slide the tray into the warm oven and bake for 10 – 15 minutes or until a toothpick comes out clean. Serve warm or at room temperature and freeze some for a later date.  

    Like I said, I used a bit too much applesauce (only use a teaspoon or even less) and I think the fact that the blueberries were frozen this time made them look a bit different (although they’re just as tasty). It could be one of my ingredients, but I’ve found that these do best stored in a freezer bag in the fridge (or freezer) until you need them.

    I’m particularly pleased that there are only two tablespoons of sweetener — and a naturally-produced one, at that! (You could also use maple syrup, I’m sure. Mmm. I might have done that the first time, actually.)

    Here some eye candy I took after our first batch to end for today…

    I'm a Ham - image  on https://megactsout.com

    I'm a Ham - image  on https://megactsout.com
    Side note: Today’s World Animal Day. For some ideas on how to celebrate, check out the Green Child Magazine article I wrote for the occasion.

Plain Ol’ Pizza? Think Again

Before sharing an easy little recipe, I just wanted to mention that Hadley’s birthday came off without a hitch (miraculous!! Not even a meltdown from the birthday boy!). Dave and I hope to tag team a couple of posts, so those will come a tad later. Just wanted to thank all the friends and family who helped us celebrate our special little boy. And, now, on with the show!


I’ve had some pizza dough thawing in the fridge for days, with one plan percolating in my mind: grilled pizza. It’s the closest thing to wood-fired pizza that you can make at home, smokiness and char marks included. Side note: I know there are folks who swear by a pizza stone, but with how infrequently I’d use it, it would inevitably turn into just one more clutter-causing item in our kitchen. So, just can’t take the leap, sorry!


So, when we saw plenty of blue sky and puffy white clouds last night for the first time in weeks (we’ve had puffy clouds, just not at dinner time), I declared it pizza time.

This is a wicked fast meal. Seriously, it took longer to heat the grill and make the salads. So, if you try this at home (which I advise you do!), it’s all about the prep! Get everything ready, then it’s only a matter of moments until you’re chowing down.

I'm a Ham - image blogger-image-1145635140 on https://megactsout.com

I'm a Ham - image blogger-image-177808706 on https://megactsout.com


Grilled Pizza
Pizza dough
Olive oil
1/2 to 3/4 cup sauce
3/4 to 1 cup shredded cheese (we used parm and our new favorite soft cheese, havarti)
Any toppings you like (ours was plain ‘cuz we’re boring like that, but you could grill some peppers, mushrooms…heck, STEAK if you want; just grill it up first because the dough doesn’t take long and they won’t have a chance to soften on their own)

Preheat your grill. Drizzle your dough with olive oil (I put some on a plate and flipped it to coat – this is imperative!). Get all your toppings shredded and ready; bring them outside on a tray.

Set the grill to medium.

Hold up the dough and allow gravity to help stretch it out. You won’t get a round pizza; it will be rustic, but that’s okay! Set the dough down straight on the grill rack and close the top for a minute or two. It’s ready to flip when you out a spatula under and the dough separated easily; you may have to work a little if it settled into the notches, but it should be relatively easy. 

Once it’s flipped, start putting your toppings and sauce (if using) on top. Put your lid down to allow the cheese to melt. Once it’s melted (really only a minute or two) use a spatula or two (maybe tongs, too; depends on what you find easiest) to slide the pizza off the grill and onto a clean plate. And, finito!

Serve with a salad and a glass of wine (or water…still nursing), and think about how sometimes the simplest things in life are the best.